Summary
The blog post focuses on controlling the coffee roasting process. It discusses techniques for detecting roasting variations, the role of customer perception in coffee quality, and the influence of roast color and development time on flavor. It also covers strategies to avoid roasting defects, explores the thermodynamics of coffee roasters, and advises on adapting roast profiles for different batch sizes.
Introduction to Coffee Roasting Control
This blog post zooms in on the ‘Control’ part of CoffeeMind’s competency roadmap.
Take a few minutes to think about this question:
- What criteria have you set for yourself when controlling your roaster ‘good enough’?
Controlling the roast is one of the most popular subjects, and often, there are two fundamental questions from a methods perspective that are not addressed before people obsess about small details without considering whether minor differences make a difference at all!
What is ‘small’ and ‘big’ and for whom?
There are two central questions that should be considered up against any claim of ‘consistency’ accuracy:
- What variation would I myself be able to detect?
- What variation would my customers be able to detect?
When dealing with the first question, you should spend more time on honest, blinded discriminative cupping (triangulation) than posting fancy pitch-perfect roasting sequences on Instagram.
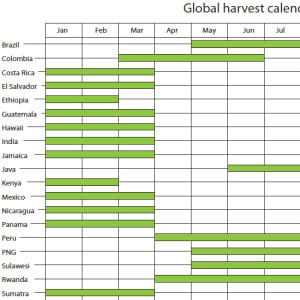
When dealing with the second question you need to know your customers before you can answer this, as different customers have different sensory thresholds for detecting variation, as you can see from our roast master competency roadmap below:
There is no need to overdo it for some segments (if one customer segment add milk, you don’t need to waste batches with differences in variation that you would be able to pick up), but if another audience has an educated palate, please be careful not to send any deviation from a corresponding narrow QC protocol to this segment. There is no ‘playing safe’, so be specific to your different customer segments and throw out what is needed, but DON’T throw it out if you don’t need to!
Expose the fundamental thermodynamics of your coffee roaster
The method of exploring the thermodynamics of your roaster and, in that process, establishing the ‘standard roast’ on your particular machine is covered extensively in the inexpensive (€30) E-learning course [Roast Profile Design Basics e-learning]. Suppose you want a live hands-on experience doing this where we are also dipping our toes in the subsequent two phases of our above-illustrated competency framework. In that case, you can participate in one of our [VIRTUAL live roasting courses]. Hope to see you soon 🙂
What parameters should I focus on when gaining control?
Take a few minutes to reflect on this question:
- What are the parameters you use as a yardstick for control? Technical? Sensory?
- And how have you set up the procedure and what are the thresholds?
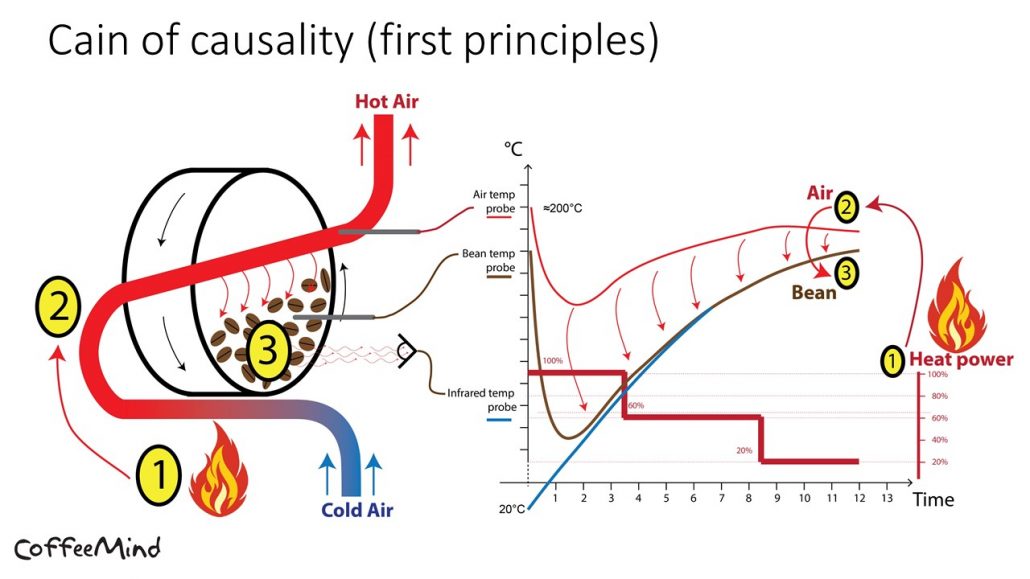
The input: The cause of it all is the heat source when it comes to coffee roasting (heating green beans until they get sufficiently brown). So, make sure you have a plan for your flame while roasting and know your system well enough just to execute the plan and then get the result you planned (with variance tolerances set per customer segment so you don’t throw out anything you don’t need to).
Print your version of the CoffeeMind color palette by getting the file here: [CoffeeMind color palette]
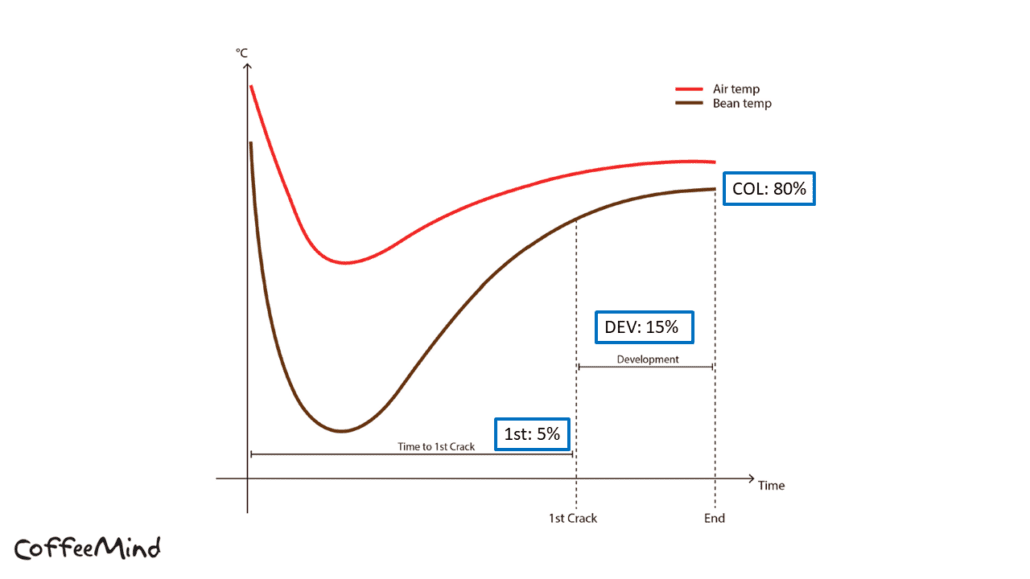
The output: The roast colour intensity (how ‘brown’ it is) is a visual cue of how much energy the beans have absorbed and, therefore, measures how ‘progressed’ the roasting process is. As we have shown in our scientific research, roast colour intensity (check out this passage in this webinar on roast colour intensity) determines 80% of the possible flavour modulation of a particular green bean, and the timing of the roast is only responsible for 20% of the possible flavour modulation. And the time after the first crack is more important (15%) than the time to the first crack (5%). It is worth noting that the 5% of flavors modulated before the first crack is NOT zero percent! Coffee professionals can detect variation here, but if somebody just adds a droplet of milk, these differences are gone!
So focus on:
- Flame plan (simple steps from high to low at planned bean temp trigger points)
- Color
- Development time
- Time to first crack
Don’t overcomplicate this with fancy calculations and logging too many things (who knows when it’s yellow, cinnamon, or dry anyway?)
The theory behind which roast parameters to focus on and why are extensively covered in the Roast Profile Design Basics e-learning (€30) course
Strategies to Avoid Common Roasting Defects?
Take a few minutes to reflect on this question:
- What do you think roasting defects are?
- What do you think they are caused by?
- How can you avoid them?
A too-fast roast or too-slow roast causes roasting defects. Roasting defects only appear in the extremes and not by slight variations on the bean curve during roasting.
This is why the first step in CoffeeMind’s standard roast, as instructed in the Roast Profile Design Basics e-learning program, is to find the maximum flame you would ever use (often
this is not 100%!) If you stay out of that extreme, you won’t need to worry about speed-related defects again on that particular roaster. If you are a race car driver, the first fundamental question would be: What is the relationship between the engine’s power and the car’s weight as this determines the acceleration? The best way to determine this is to jump in to get a car, turn it on, and just step on it 100% and measure how fast it goes to 100. This will tell you if you ever use full throttle on the race track you are heading for. As for some cars, this would make you end up with your car upside down outside the racetrack! This exercise is not only a theoretical answer but a more intuitive/visceral experience for both the race car driver and the coffee roaster as it gives a ‘feel’ for the machine to feel the power and see where it takes the vehicle. I always see roaster students developing INTUITION with the machine during this exercise to easily predict how the roaster behaves after going through the exercise. Intuition does not mean roasting blindly! It means that you can quickly develop a better plan for the next roast based on what you have learned on previous roasts.
Avoiding too-slow roast is also easy once you gain control and do experiments, and here, it is also important to remember that ‘defect’ is a relative term depending on who tastes it. In our Roasting Defects Research, the consumers preferred the reference roast, but the second preferred was the baked sample! And the light sample was the least preferred, so I guess we did not have a hipster audience for the consumer testing 🙂
Thermodynamic Blueprint of Coffee Roasters
Please take a few minutes to think about this question:
- Can I set up my equipment and execute a roast plan with predictability so I don’t have to interfere during roasting to ensure it runs as planned?
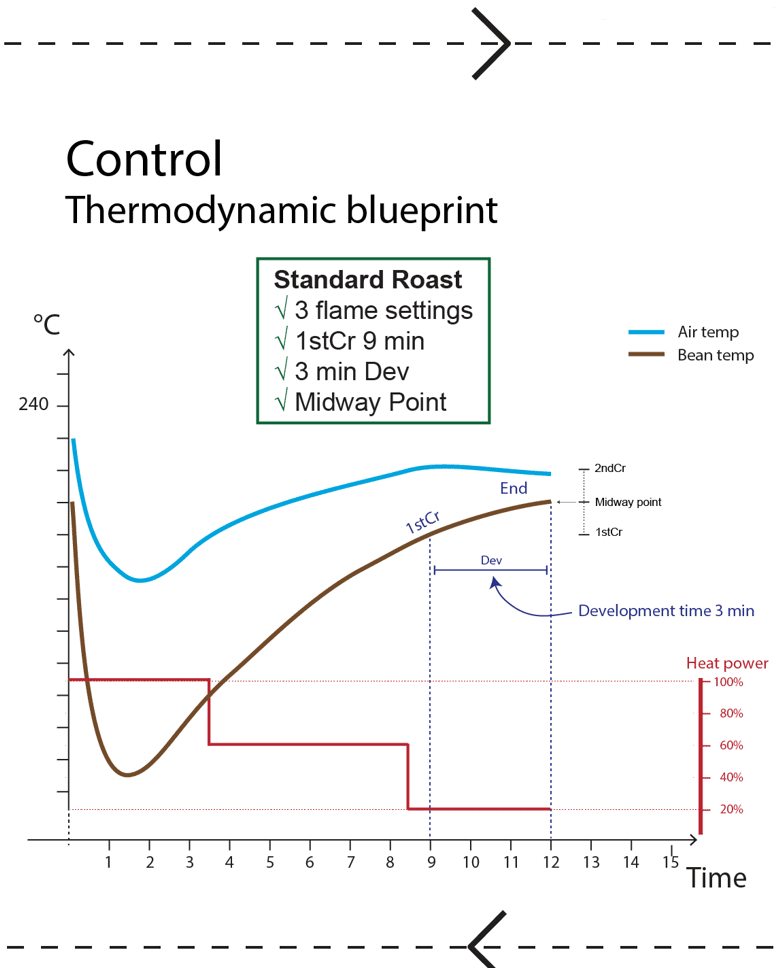
This is the core experiment in the Roast Profile Design Basics e-learning course, and the simple instruction is to iteratively create what we call ‘The Standard Roast’ which is:
We claim you didn’t know your roaster before exposing a basic 3-flame setting profile from your machine. As long as the bean types are Arabica, screen 16 or above with 10-11% moisture, the type of bean does not matter that much.
As solving this riddle ends the ‘Control’ phase in your competency pillar as a coffee roaster, you are soon moving to the next competency pillar, ‘Experimentation’, where there are no rules. You no longer need to stick to the 3-flame setting from high to low template; however, you would be surprised how you can often just make a simple variation to this 3-flame setting template and achieve the flavour experiments most relevant for your product development process.
How do I adapt my roast profiles to different batch sizes?
Please take a few minutes to think about this question:
- What reference points do I trust when I roast the same product at a different batch size?
When you change your batch size, you change the thermodynamics of the system (if you know how much time it takes to boil one litre of water and you suddenly need to boil only half a litre, you will also expect the energy required to be different and have to re-think your heat application).
So the simple answer is to re-do the thermodynamics of the system with the new batch size, which is done by doing the exercise in the Roast Profile Design Basics e-learning course again with the new batch size.
To give you an idea of the differences between different machines and particularly batch size influence, take a look at the 3-flame setting protocols for the different machines in our academy and notice the flame settings, particularly for the Coffee-Tech Silon with only 2kg added to an otherwise 7kg max batch size roaster.
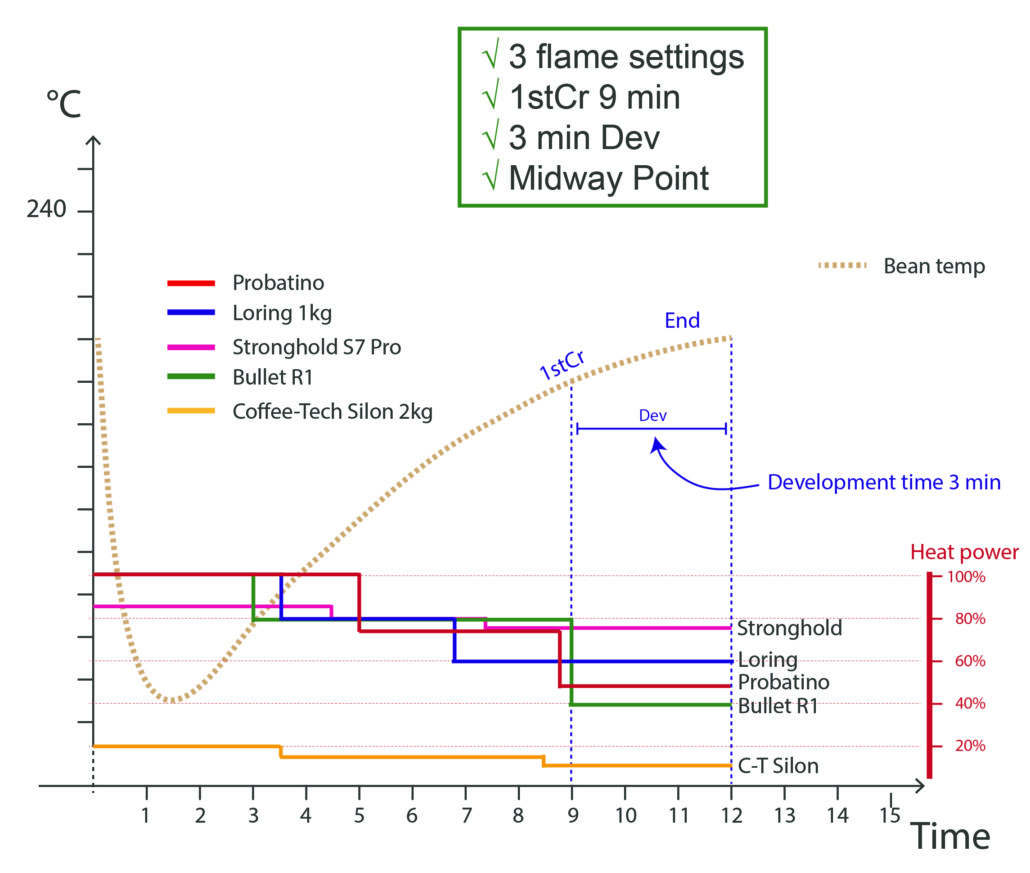
How do you think your roaster would behave in this exercise? As you can see, they are quite different and by keeping it simple and fundamental you get a very clear picture yourself that will be the basis of your intuition on how to build up roast profiles in the future even if you decide to have more than 3 flame settings when you start product development / experimentation which is the next step in our competency framework.
If you want to explore this yourself on your own equipment you can do so by following the theory and instructions in our affordable (€30) elearning program Roast Profile Design Basics available on our website where you could start in a few minutes!